Add Overtime Request
To add an overtime request, go to Time Attendance > Overtime Request and click ![]() , then the following page will appear.
, then the following page will appear.
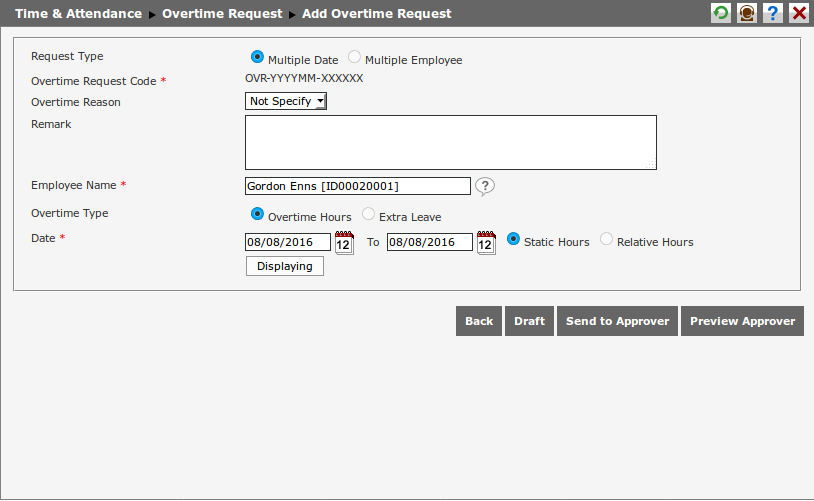
Complete the following fields to add new overtime request:
- Request Type: Choose one of overtime request types. There are two options of request type:
- Multiple Date: It is the overtime request for an employee within a certain range of date. For example, employee A submits an overtime request from 18/01/2012 to 20/01/2012.
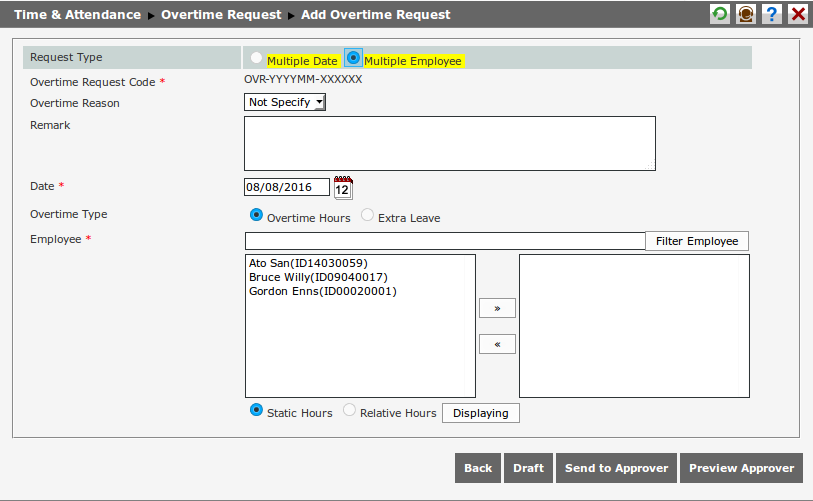
- Multiple Employee: It is the overtime request for multiple employees on a certain date. For example, the overtime request for employee A, B, C and D on 21/01/2012. The following is the form of overtime request for multiple employee.
- Overtime Request Code: It is the number or code generated by system.
- Overtime Reason: Choose the reason of employee overtime. This field will appear if the configuration in Setting | System Setting | System Parameter | Company Parameter Setting > Attendance tab is set to "Enable Overtime Reason". The options appeared are based on those added or edited in Setting | Time Attendance Setting | Overtime Reason.
- Remark: It is the reason why employee needs to work overtime.
- Select Employees: Select the name of employee who works overtime (the employee for whom the overtime is requested). For Multiple Date selection, select the employee name by clicking the suggestion tip icon and selecting the name from available options. Whereas for Multiple Employee selection, select the employee name from the left box and move it to the right box by clicking
 . Click
  to filter employee appeared on the options.
 - Date: Determine the start date and end date for overtime request with Multiple Date type, and determine the overtime date for the overtime request with Multiple Employee type by using the calendar.
- Hour: Determine whether user wants to use static hours or relative hours to input the overtime hours. If user chooses Relative Hours and clicks "Display", then the additional display will appear as the following.
In addition to display employee's working shift hour, this page also displays employee's actual working hour. Besides, when user requests the overtime using relative hours, then user needs to input the total of overtime hours in minute. There are three provided fields here: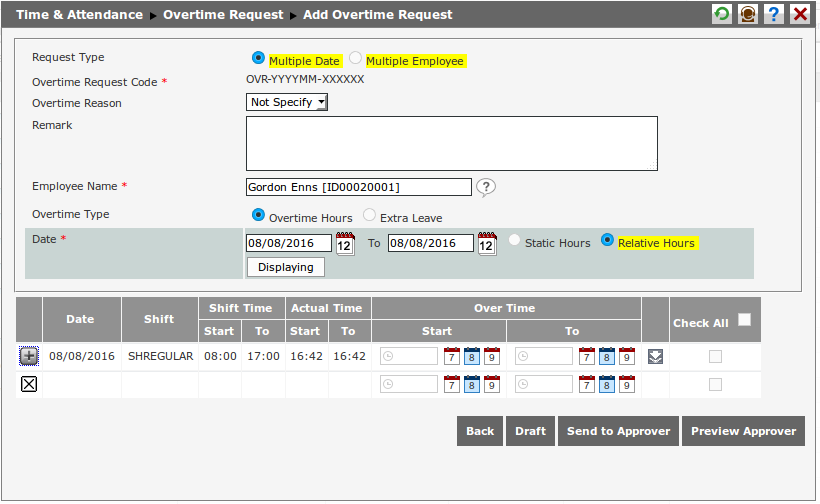
- Before: It is the total of overtime minutes before the shift starts. For example, if the shift start time is 8 a.m, but user starts working from 6 a.m. Therefore, this field is filled 120 minutes (06.00-08:00). However, the calculation of overtime time limit before the shift starts is still being adjusted with the daily shift setting based on each company policy.
- Break: It is the total of break time in minutes according to the daily shift. For example, the break time starts from 12.00-13.00 based on the Shift Daily; in fact, the employee does not have a break due to working on something. In this case, this field is filled 60 minutes (12.00-13:00). Note: the Break field will only appear if "Calculate Break" is set in daily shift setting.
- After: It is the total of overtime minutes after the shift ends. For example, the shift ends at 17.00; but the employee works overtime from 17:00-21:00. Therefore, this field is filled 240 minutes (17.00-21.00). However, the overtime hour calculation after the end of the shift is still being adjusted with the daily shift setting based on each company policy.
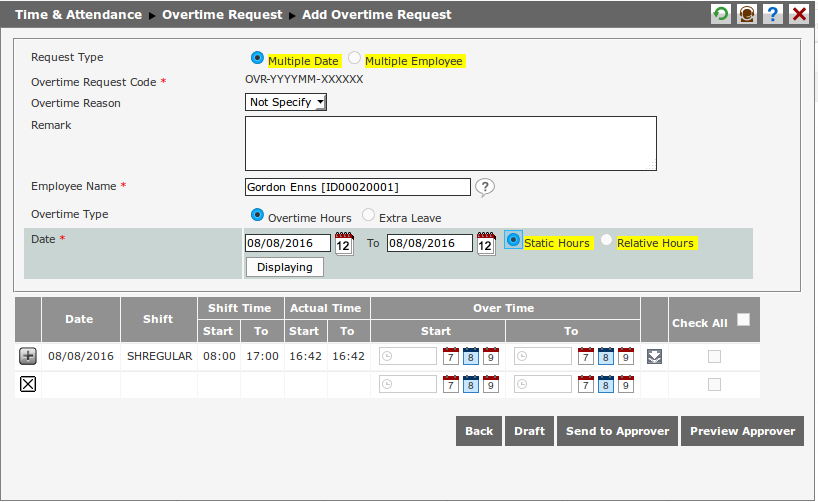
In this page, in addition to show employee's working shift hour, the overtime request with the type of static hours also shows employee's actual working hour. For this type, user only needs to input the range of overtime hour along with the overtime date. For example, if employee's working hour is 22.00-06.00 and the employee works overtime between 20:00-22:00 and 06:00-08:00, then employee needs to input 20:00 for overtime start time and 22:00 for overtime end time. Afterwards, click the calendar icon to determine the overtime date. Click
 to add row. Input the next overtime hour which is from 06:00 to 08:00 along with the overtime date.
 - Check All : Select the checkbox on "Check All" column for the overtime hour that will be requested. This checkbox will be automatically selected when user types in the overtime hour. However, user can deselect it if the overtime hour is not requested to the approver.
- Click
 to save the request as draft in the system. Click
  to send the request to the approver. Click
  to abort this action and go back to the main page of Overtime Request.
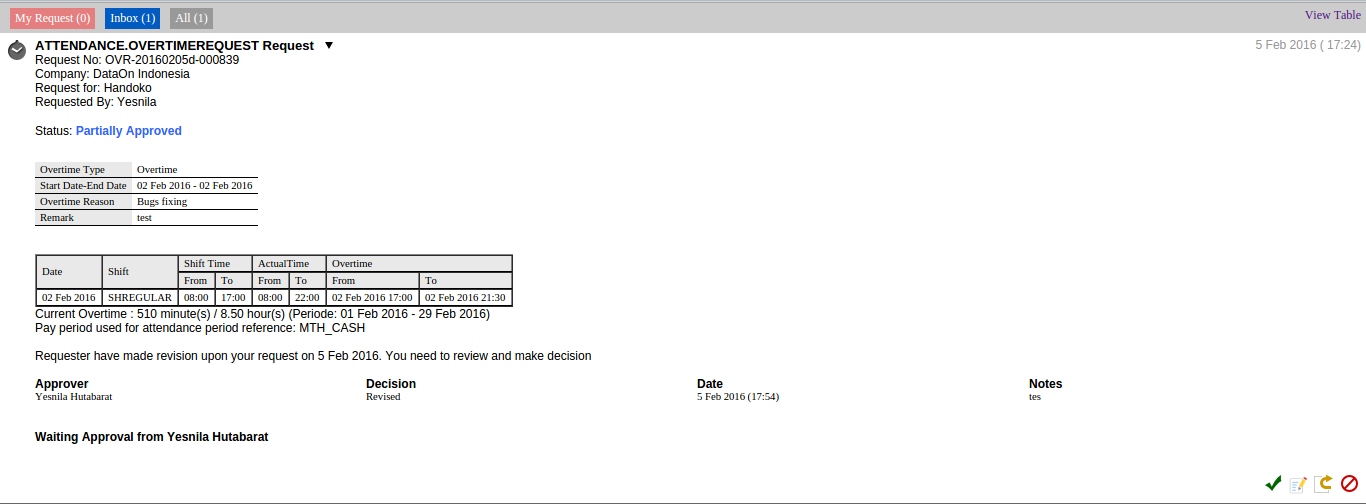
If the overtime request has been sent to the approver, the request will go to the approver's inbox. In approver's inbox, the approver can see the information similar to the overtime request such as employee shift hour, employee actual working hour and the overtime hour requested by employee as the following.

- None :
 means that the request status will not be processed / ignored.
 - Approve :
 means that the request will be approved.
 - Revise :
 means that the request needs to be revised by the requester.
 - Reject :
 means the request is rejected by the approver.
 - Cancel :
 means that the request is cancelled by the requester.
 - Close :
 means that the request is already closed by the requester.
Click ![]() to proccess approving overtime request at the same time.
to proccess approving overtime request at the same time.